The start to a new year is almost synonymous with goal setting and setting up your planner or calendar. I’ll be honest, I love the newness of a brand-new year. It signals a fresh start or a blank slate that feels exciting, hopeful and full of potential.
If you agree at all or just want to plan your year, in this post I detail exactly how I planned my entire 2022 calendar using a DIY approach that is low cost and really low effort. Setting up your calendar is actually very easy to do. Instead of purchasing one at the store you can print a DIY version at home through your home computer and printer.
These are 5 easy steps you’ll take to set up your entire calendar.
Print out a DIY calendar using a computer and printer
I’ve been saving money for years by printing out my own calendar from my computer. It’s a very easy task and I’ll walk you through the process, step-by-step.
From a Macbook, you will access the calendar app (you can also do the same with Windows).
From the application, type on your keyboard the keys command plus the letter “p” at the same time to bring up the print menu.
This command will bring up the print menu.
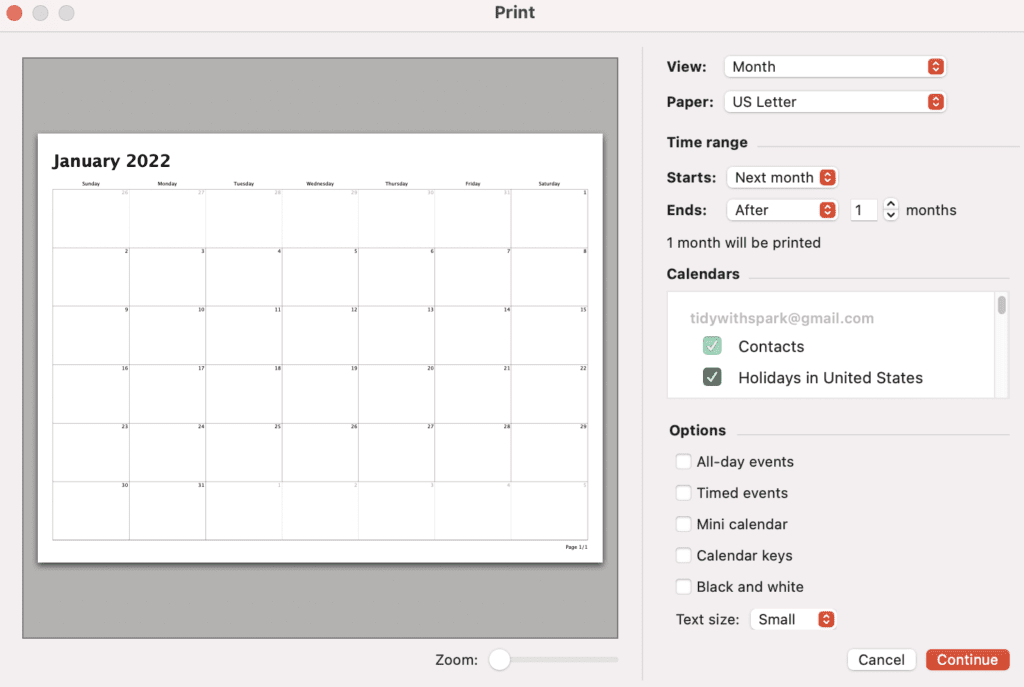
Once on the print menu screen there are some options to manually change.
I like the default view of the month because that’s how I like to print out my calendar.
In the time range section I end after 12 months so that I can capture an entire year.
The options section allows for additional selections related to holidays and existing events on your calendar.
I personally like a clean slate so I uncheck these options on my calendar view.
Finally, click on continue and you’ll be taken to another screen that looks like this.
In this window, verify that you are working with 12 months and then select print.
And that’s it. It’s very simple to print your own DIY Calendar!
Add Important Anchors to Your Calendar
Now the real fun begins where you start to plot out all the elements to your calendar.
I call these anchors and I have heard others refer to these as rocks. Essentially, you are notating any key events and dates in your life that must be considered a priority before you add any other events to your schedule.
Personally, for me this would include any birthdays and holidays. I am mindful and conscious of these dates first because in my world, missing them is a non-negotiable.
Take the time to write and plot down any birthdays of loved ones, anniversaries and special dates, while also adding in any major holidays that you celebrate.
Here is a short list of dates to include:
Birthdays
Holidays
Anniversaries
Optional: School closure dates
As you go along in this exercise, I take a little bit of extra time to highlight each event type with the same color. All birthdays are coded one color such as pink and then all holidays are highlighted in green, etc.
Visually marking up my calendar in this way makes it easy for me to spot out the important days by type.
Optionally I also like to include school closure dates because as a parent these are very important to me so that I make sure my children are taken care of on these days.
Add Important Business Dates
If you’re a small business owner like me, then there are likely important dates that relate your business and industry. I like to take the time to plan out any big launches or new offerings on the calendar.
As a quick tip, I always like to do this part in pencil rather than in ink because I’m plotting dates that have some flexibility. With my anchors already scheduled on the calendar plotting business dates will always yield to the personal rocks in my life.
It’s another way that I uphold my priorities and establish clear boundaries between personal and work life.
In this section of planning I also like to plot out important tax dates as well.
Fill In Any White Space
I’m an avid note taker. It has become essential over the years.
It’s a tool that helps me clear my mind and get organized.
That’s also why I use the white space on the margins of the printed calendar to jot down any ideas I have for that month related to projects of personal dates.
When I take the time to write things down I’m better able to organize my thoughts and process them in a linear manner.
Add Joy with Stickers or Colored Markers
Since my early days as a pre-teen I have been obsessed with all things stickers. Remember, Lisa Frank…well, I had a slightly unhealthy obsession with stickers during these years and I’m not embarrassed to share it. Stickers and colored markers add joy and vibrancy to our lives and it makes perfect sense to add them to my calendar during this exercise.
In the past as a child, I would even save my stickers for a special occasion because I didn’t want to waste my stickers. But today I know better and freely use them because each and every day is a special occasion!
That’s the last step. Add joy to your calendar and marvel at the work you just completed.
Conclusion
You’re probably experiencing a wave of accomplishment as you see your 2022 calendar all organized and planned out! It’s exciting to be hopeful to the new year and all the opportunity that a fresh start brings.
Check out my videos on this DIY calendar process. You can view one for the printed calendar and one for the step-by-step process of filling out the calendar.
If you’d like one that that is already done for you, click on the link below to download instantly today.
You’re now one step closer to realizing your dreams for 2022.
Southern California based Professional Organizer, Sandy Park, owner and founder of Tidy with SPARK shares her joy of organization with her clients.
She serves clients in Orange County as well as the hundreds of thousands of followers on her combined social media platforms.
Connect with Sandy through her website or by connecting through her social channels.
This website uses cookies to improve your experience. We'll assume you're ok with this, but you can opt-out if you wish. Cookie settingsGOT IT!
Privacy & Cookies Policy
Privacy Overview
This website uses cookies to improve your experience while you navigate through the website. Out of these cookies, the cookies that are categorized as necessary are stored on your browser as they are as essential for the working of basic functionalities of the website. We also use third-party cookies that help us analyze and understand how you use this website. These cookies will be stored in your browser only with your consent. You also have the option to opt-out of these cookies. But opting out of some of these cookies may have an effect on your browsing experience.
Necessary cookies are absolutely essential for the website to function properly. This category only includes cookies that ensures basic functionalities and security features of the website. These cookies do not store any personal information.